
In a nutshell, Kubernetes is a container orchestration tool that enables container management at scale. Kubernetes isn’t a replacement for Docker. However, Kubernetes is a replacement for some of the higher-level technologies that have emerged around Docker (i.e Docker Swarm). To learn more about Kubernetes, check out this Getting Started Guide.
Enters Azure Container Service (AKS) which manages your hosted Kubernetes environment, making it quick and easy to deploy and manage containerized applications without container orchestration expertise. It also eliminates the burden of ongoing operations and maintenance by provisioning, upgrading, and scaling resources on demand, without taking your applications offline.
[Important]: Azure Container Service is currently in preview – Some aspects of this feature may change prior to general availability (GA).
This post will demonstrate how to configure a SQL Server instance on Kubernetes in Azure Container Services (AKS) with persistent storage for high availability. The outcome provides resiliency against SQL Server pod failure or cluster node failure. Kubernetes 1.6+ has support for Storage Classes, Persistent Volume Claims , and the Azure disk volume type. You can create and manage your SQL Server instances natively in Kubernetes.
The following will walk you through creating a deployment to achieve a high availability configuration similar to shared disk failover cluster instance. In this configuration, Kubernetes plays the role of the cluster orchestrator. When a SQL Server instance in a container fails, the orchestrator bootstraps another instance of the container that attaches to the same persistent storage.
Of course i’m on macOS, but this could also be done using Windows or Linux…
Requirements Link to heading
First thing, you will need an Azure subscription with enough credits to provision the Kubernetes cluster (4 VMs).
Install Azure CLI
Next you need to have Azure CLI installed - For detailed instructions on how to install and configure the Azure CLI follow this link.
Install kubectl
After installing the Azure CLI run the following command to install kubectl (need elevated privileges)
sudo az aks install-cli
Ensure to add kubectl in your search PATH
Deploy a Kubernetes cluster in AKS Link to heading
Simply follow these guide steps to deploy an Azure Container Services cluster:
Note: Replace values in <> with your own named values
Configure security context
az login
Follow instructions at the prompt
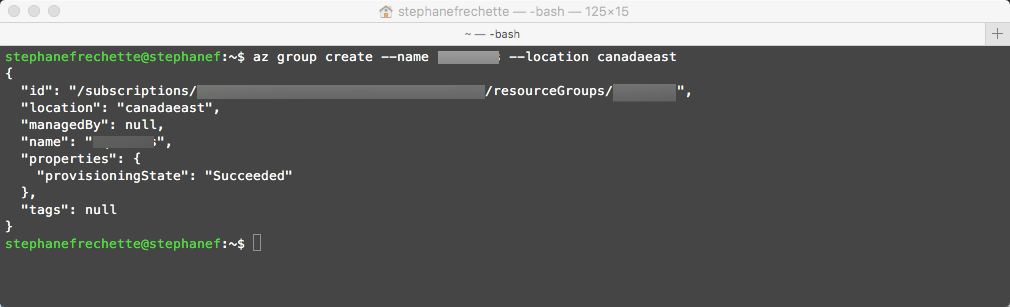
Create a resource group
az group create --name <em><resourceGroupName></em> --location canadaeast
While AKS is in preview, only some location options are available. These are eastus, westeurope, centralus, canadacentral, canadaeast
Create Kubernetes cluster in Azure Container Services (AKS)
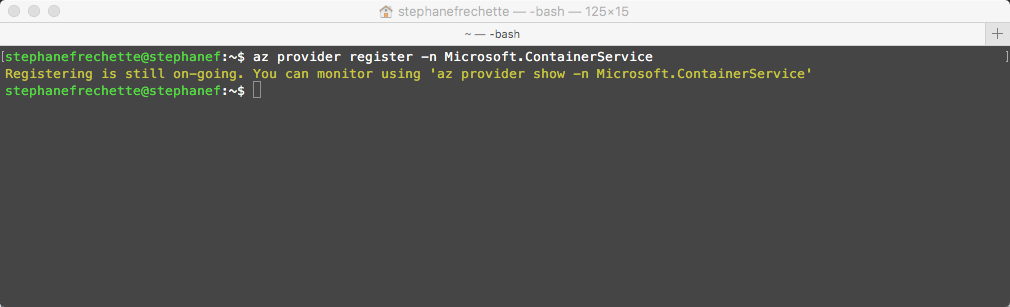
az provider register -n Microsoft.ContainerService
While AKS is in preview, creating new clusters requires a feature flag on your subscription. You may request this feature for any number of subscriptions that you would like to use. Use the az provider register command to register the AKS provider. After registering, you are now ready to create a Kubernetes cluster with AKS.
Create the cluster
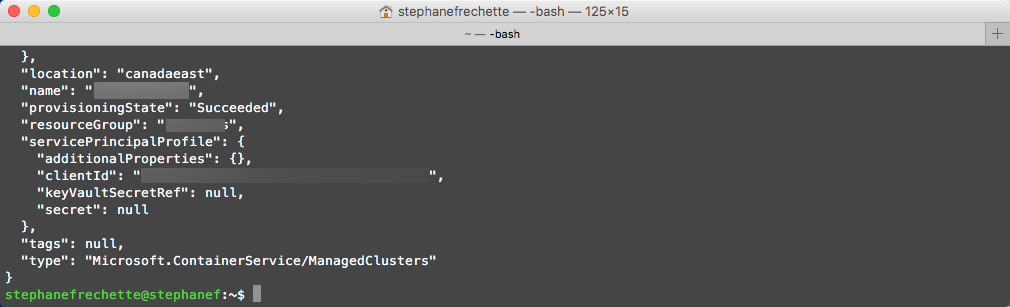
az aks create --name=<em><clusterName></em> --resource-group=<em><resourceGroupName></em> --generate-ssh-key --location canadaeast
Expect to take a couple of minutes to bootstrap the cluster. The command will return once bootstrapping is complete.
Something similar to the following:
Next let’s Authenticate into the cluster
az aks get-credentials -n <em><clusterName></em> -g <em><resourceGroupName></em>
and validate connectivity to the cluster
kubectl get nodes
You should see that our newly created cluster with 3 nodes and a status of Ready.

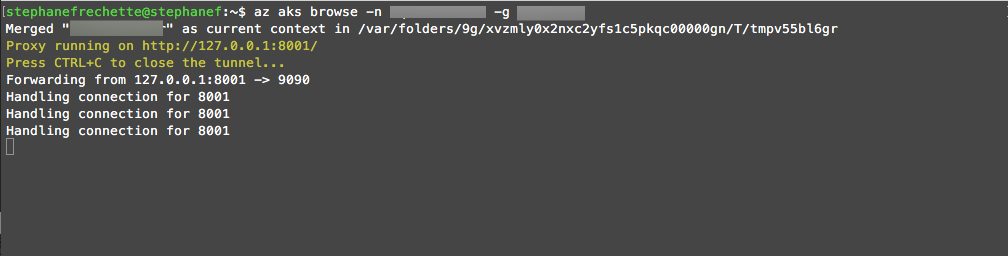
To explore the web-based Kubernetes dashboard, issue the following command:
az aks browse -n <em><clusterName></em> -g <em><resourceGroupName></em>
A new browser tab or window should open or simply navigate to http://127.0.0.1:8001
Deploy SQL Server in Kubernetes Link to heading
Create secret to store SQL Server SA password
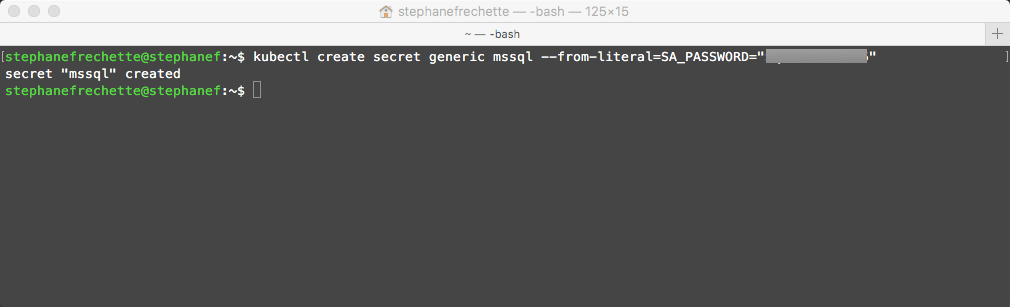
We will now create a password in the Kubernetes cluster. Kubernetes can manage sensitive configuration information like passwords as secrets. The following command creates a secret that holds the value for the password that will be using for the SQL Server SA account. Replace YourComplexPassword with a complex password.
kubectl create secret generic mssql --from-literal=SA_PASSWORD="<em>YourComplexPassword</em>"
Configure storage for SQL Server files
Create a manifest to define the storage class and the persistent volume claim. The manifest specifies the storage provisioner, parameters, and the reclaim policy. The Kubernetes cluster uses this manifest to create the persistent storage.
The following yaml example defines a storage class and persistent volume claim. The storage class provisioner is azure-disk because this Kubernetes cluster is in Azure. The storage account type is Standard_LRS. The persistent volume claim is named mssql-data. The persistent volume claim metadata includes an annotation connecting it back to the storage class.
Open your favorite editor (VS Code) and paste the following:
- pvc.yml
kind: StorageClass
apiVersion: storage.k8s.io/v1beta1
metadata:
     name: azure-disk
provisioner: kubernetes.io/azure-disk
parameters:
  storageaccounttype: Standard_LRS
  kind: Managed
---
kind: PersistentVolumeClaim
apiVersion: v1
metadata:
  name: mssql-data
  annotations:
    volume.beta.kubernetes.io/storage-class: azure-disk
spec:
  accessModes:
  - ReadWriteOnce
  resources:
    requests:
      storage: 8Gi
Save the file (for example pvc.yml)
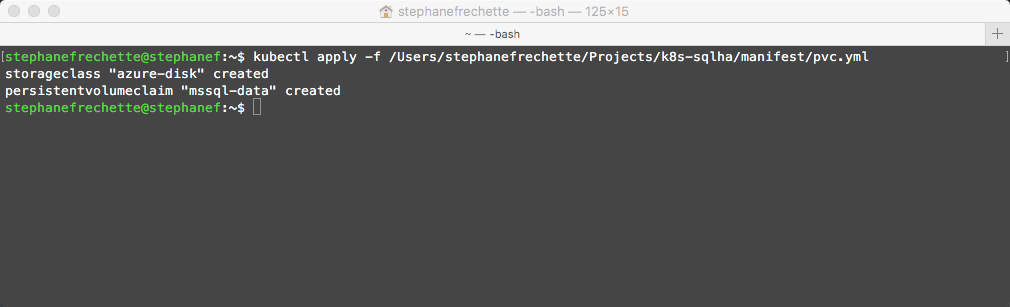
Create the persistent volume claim in Kubernetes
kubectl apply -f <em><Path to you recently saved pvc.yml file></em>
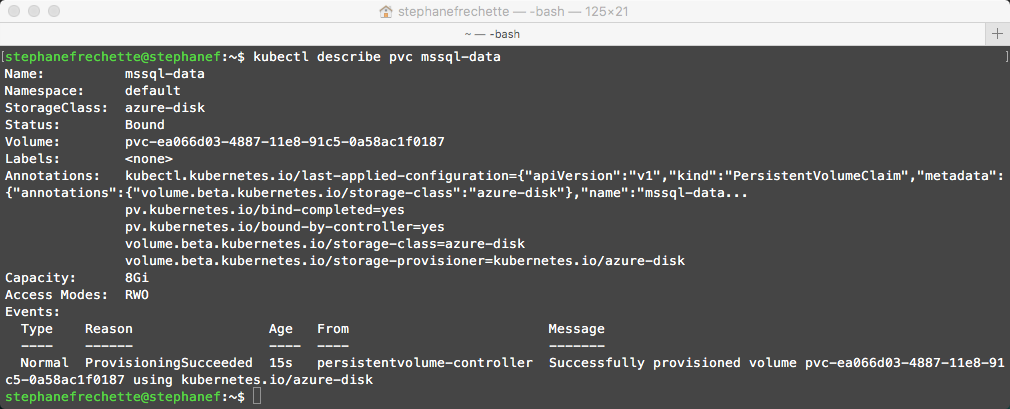
Verify the persistent volume claim
kubectl describe pvc mssql-data
In our pvc.yml created earlier the persistent volume claim is named mssql-data
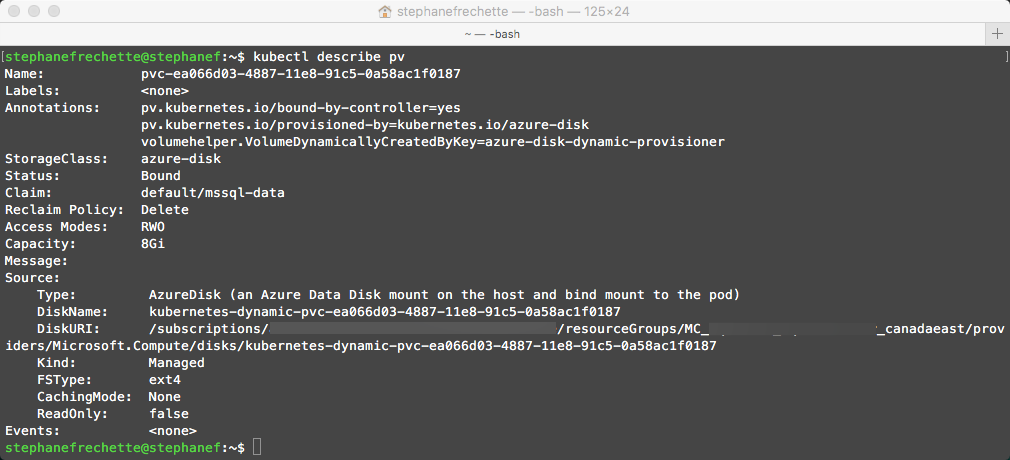
Verify the persistent volume
kubectl describe pv
Create the deployment Link to heading
The container hosting the SQL Server instance is described as a Kubernetes deployment object. The deployment creates a replica set. The replica set creates the pod. In this step, create a manifest to describe the container based on the SQL Server mssql-server-linux Docker image. The manifest references the mssql-server persistent volume claim, and the mssql secret that you already applied to the Kubernetes cluster. The manifest also describes a service. This service is a load balancer. The load balancer guarantees that the IP address persists after SQL Server instance is recovered.
The following describes a deployment, including a container based on the SQL Server container image. Copy and paste the following in a new file:
- sqldeployment.yml
apiVersion: apps/v1beta1
kind: Deployment
metadata:
  name: mssql-deployment
spec:
  replicas: 1
  template:
    metadata:
      labels:
        app: mssql
    spec:
      terminationGracePeriodSeconds: 10
      containers:
      - name: mssql
        image: microsoft/mssql-server-linux:2017-latest
        ports:
        - containerPort: 1433
        env:
        - name: ACCEPT_EULA
          value: "Y"
        - name: SA_PASSWORD
          valueFrom:
            secretKeyRef:
              name: mssql
              key: SA_PASSWORD
        volumeMounts:
        - name: mssqldb
          mountPath: /var/opt/mssql
      volumes:
      - name: mssqldb
        persistentVolumeClaim:
          claimName: mssql-data
---

apiVersion: v1
kind: Service
metadata:
  name: mssql-deployment
spec:
  selector:
    app: mssql
  ports:
    - protocol: TCP
      port: 1433
      targetPort: 1433
  type: LoadBalancer
Save the file (for example sqldeployment.yml)
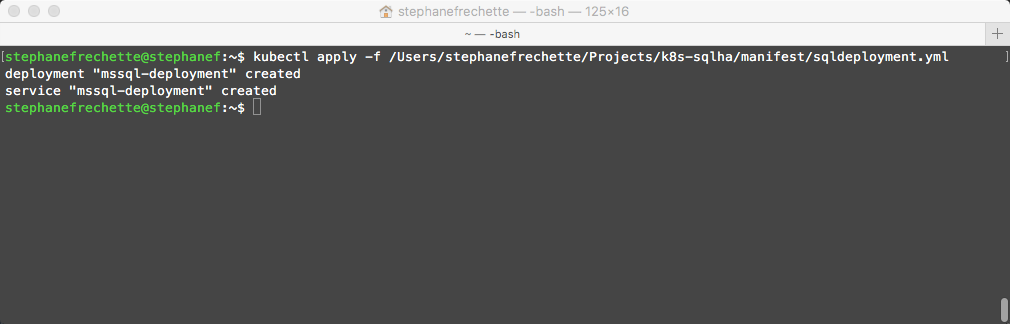
Create deployment
kubectl apply -f <em><Path to your recently saved sqldeployment.yml file></em>
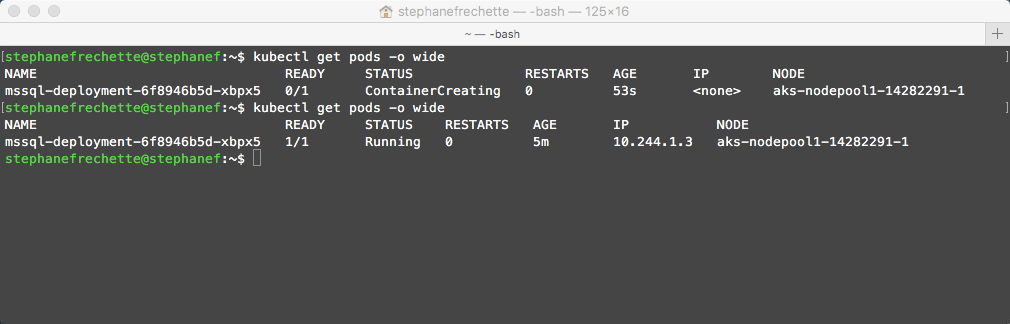
View the status of the pod
kubectl get pods -0 wide
Because I just issued the command right after creating the deployment, it is showing that the container is being created… leave it some time to pull the docker image and try again. It should then show a status of Running.
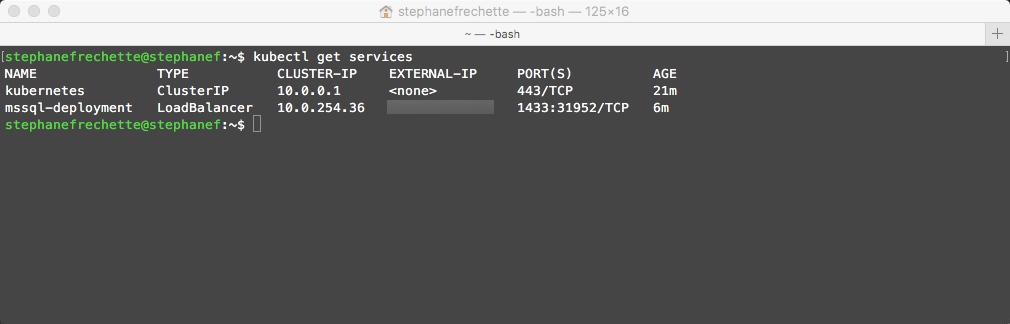
Verify the services are running
kubectl get services
Take note of the EXTERNAL-IP, that’s the one will be using to connect to the SQL Server instance.
Connect to SQL Server instance Link to heading
You could use SSMS, SSDT, Visual Studio Code and SQL Operations Studio to connect to the SQL Server instance, here will use sqlcmd
sqlcmd -S <em><External IP Address></em> -U sa -P "<em>YourComplexPassword</em>"
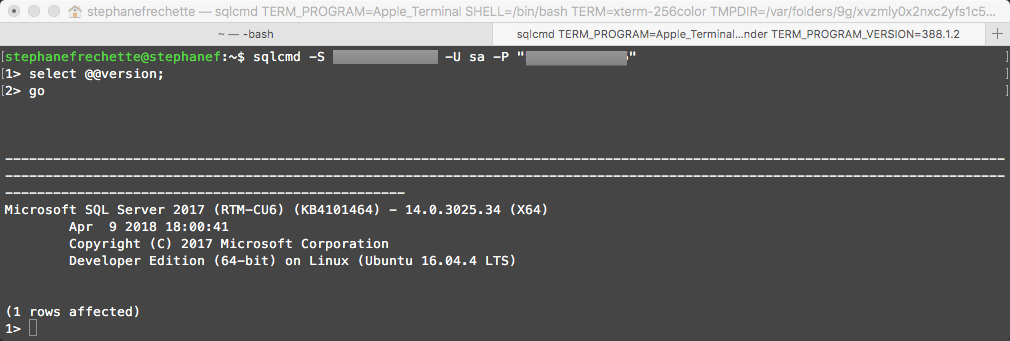
We have a connection!
Verify failure and recovery Link to heading
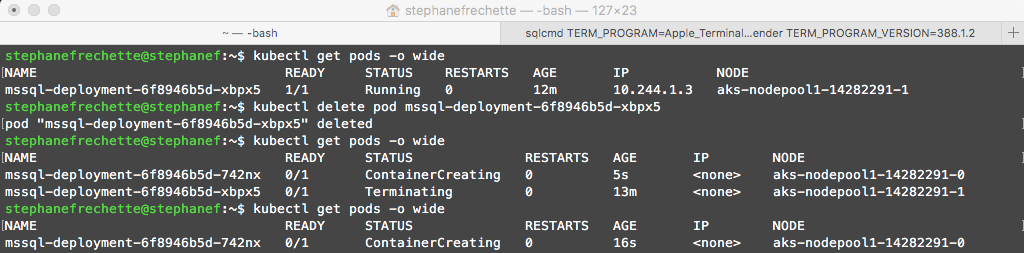
It’s now time to verify that a failure will be able to recover, in order to validate will be deleting the pod:
First list the pod which is running SQL Server
kubectl get pods -o wide
Then issue the following command to delete the pod:
kubectl delete pod <em><mssql-deployment-xxxx></em>
Use the value returned from kubectl get pods command. In this case my pod name is mssql-deployment-6f8946b5d-xbpx5 running on node 1 (aks-nodepool1-142282291-1)
After issuing the delete pod command here is what’s happening; in this case Kubernetes is terminating the pod running the SQL Server instance in node 1 (aks-nodepool1-142282291-1) and then recreating it in node 0 (aks-nodepool1-142282291-0) and then connecting to the persistent storage. In this scenario because it’s recreating a pod (SQL Server instance) in another node it is not as fast as like recreating a pod in the same node (very fast…like Instantaneously!)
It worked! Notice the pod name before and after the delete, it is different and running on a different node.

You could then use kubectl get pods -o wide to verify that a new pod is now deployed and running and use kubectl get services to verify that you have the same EXTERNAL-IP address for the new container. Hence also try to reconnect to the SQL Server instance (with same ip) and voilà!
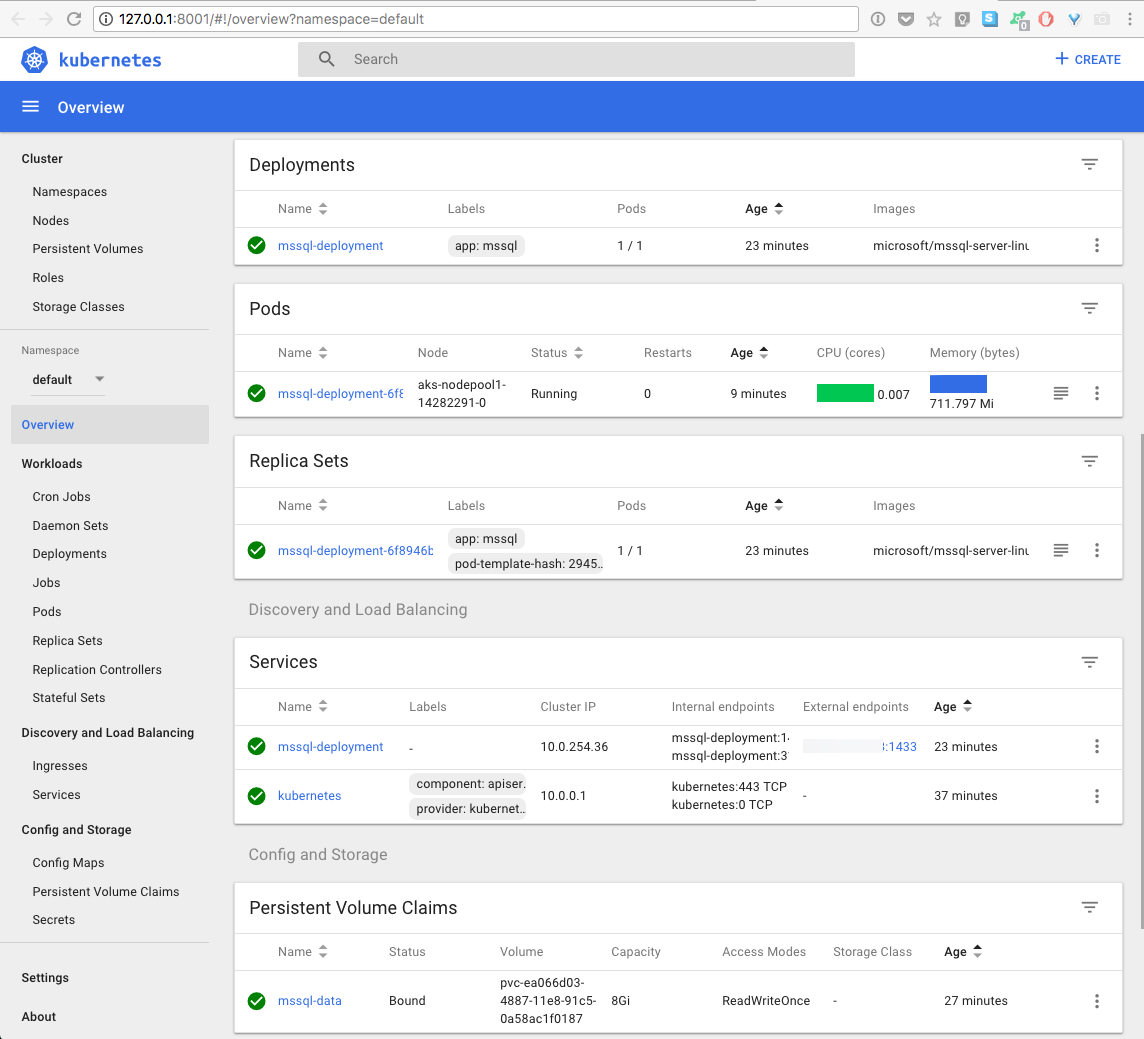
Here is a screenshot of the k8s dashboard
That’s it. We just walkthrough on how to configure SQL Server containers to a Kubernetes cluster for high availability in Azure Container Services (AKS).
Enjoy!